Page 16 of 21 FirstFirst ... 61415161718 ... LastLast
Results 151 to 160 of 205
  1. #151
    Join Date
    Aug 2014
    Location
    Orlando, FL
    Posts
    219

    Default

    Quote Originally Posted by lmnelson86 View Post
    That's bad ass. Super clean, love it! Now what else can you whip up in carbon? I love visual carbon.
    I also still have to dremel down the ends of the exposed screw tips. I was thinking of doing the same for the walkthrough storage, but I may wait on that. A 40" x 24", 1/8" sheet of that is $40. I looked into real carbon fiber sheets and its about $200 for the same size. The faux carbon fiber is on 1/8" abs which isn't that rigid and a sheet of that with no support has a bend to it. Thats why I added the 1/4" king starboard. Unfortunately, they had to be mechanically fastened because adhesive generally don't work on them. I think they may have came out with an adhesive, but I'm impatient and wanted to get it done.

  2. #152
    Join Date
    Aug 2014
    Location
    Orlando, FL
    Posts
    219

    Default Finished Engine Box Hatch

    Here a picture of the finish engine box hatch. I still need to dremel down the protruding screws in the hatch. Its a good compliment to the new dash panels.

    I also still need to reupholster the engine box...actually get all new upholstery, but that will have to wait until next winter break...since I used up my budget for the floors and stringers.


    Last edited by flipz96; 07-05-2015 at 10:01 PM.

  3. #153
    Join Date
    Aug 2014
    Location
    Orlando, FL
    Posts
    219

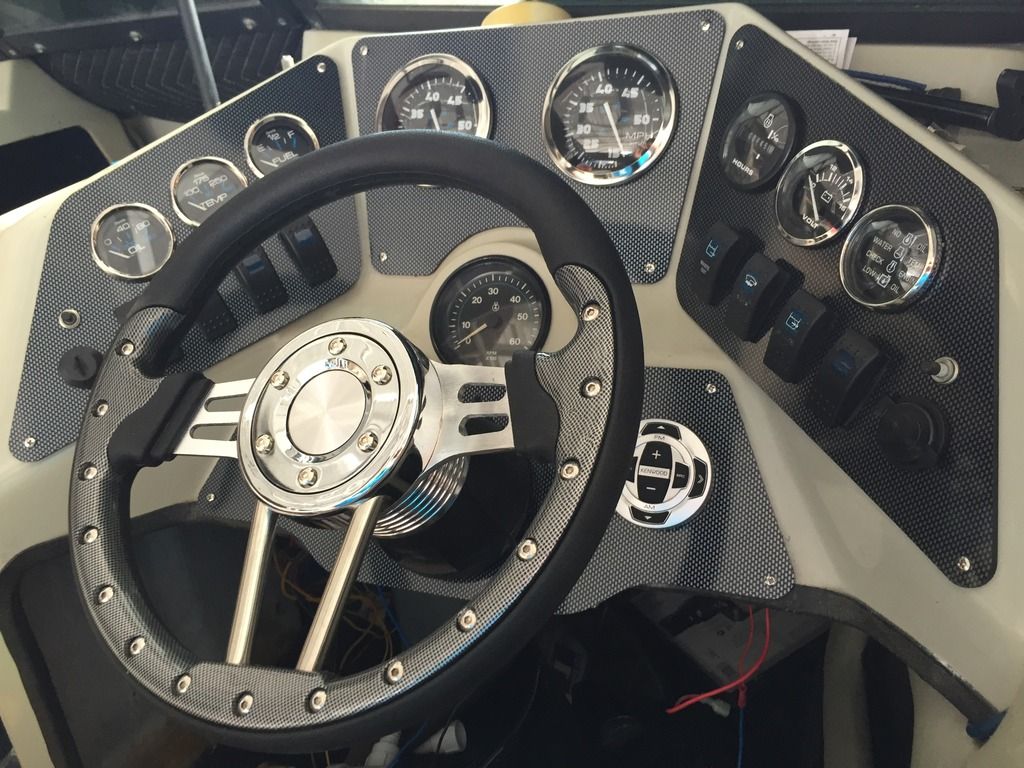
    Default Dash Panels w/ new steering wheels

    Just got done installing the new dash panels. The only thing I'm going to change is I am moving the hourmeter next to the breaker panel which is in starboard walkthrough locker. The original hourmeter was replaced before I bought it and I forgot what the PO told me that it was. I'm keeping it for maintenance purposes. I'm replacing it with a separate volt meter for my auxiliary battery. I am also going to use the switch built in on the steering wheel for the horn. I got a couple of my rocker switches from marine surplus, but I am going to replace them with new matching ones like the left panel.


    This is what it looked like before:

    Last edited by flipz96; 07-05-2015 at 10:26 PM.

  4. #154
    Join Date
    Nov 2005
    Location
    Austin Tx
    Posts
    45

    Default

    Flipz, that boat looks bad ass! I've been following your rebuild and you sure make it look easy! your new dash looks absolutely amazing. Great job
    1991 supra conbrio

  5. #155
    Join Date
    Aug 2014
    Location
    Orlando, FL
    Posts
    219

    Default

    Thanks man. Its taking me a lot longer than I wanted, but its turning out pretty good. I'm hoping to get her out on the water soon! Just got a couple loose ends to get wrapped up.

  6. #156
    Join Date
    Nov 2011
    Location
    Paris, France
    Posts
    536

    Default

    This dash looks awesome man, very nice work ! Will definitely think about it for mine

    Where did you find the long steering hub ?
    Stéphane
    -----------------------
    1989 Supra Saltare

  7. #157
    Join Date
    Apr 2015
    Posts
    121

    Default

    Sswweeeeeeeeetttttttttttttttt

  8. #158
    Join Date
    Aug 2014
    Location
    Orlando, FL
    Posts
    219

    Default

    Thanks guys! Deciding not to reinstall the black helm upholstery really brightens things up. It was in really bad shape anyways (cracked, chipped, and dirty). I almost started to make a mold of a new helm set up, but decided to go the easier route. These panels are larger than the original because it needed to cover the factory cutout in the FRP. I am adding more ss fasteners (screws) once I get all the new switches.

    The steering hub....I ordered with my steering wheel. Its the marine adapter with 3/4" keyway.

    If anyone is interested in the dwg of these, I can email it to you. I can also email as a full scale pdf if you don't have access to CAD. I would suggest printing them out full scale and do a check pattern before cutting on your finish material.

  9. #159
    Join Date
    Sep 2014
    Location
    Lake St Clair, MI
    Posts
    272

    Default

    That looks awesome man. I give you props for tackling the dash, all of those wires and gauges intimidate me. Way too much BS going on in there haha. I feel like most of it is unnecessary.

  10. #160
    Join Date
    Aug 2014
    Location
    Orlando, FL
    Posts
    219

    Default

    Quote Originally Posted by lmnelson86 View Post
    That looks awesome man. I give you props for tackling the dash, all of those wires and gauges intimidate me. Way too much BS going on in there haha. I feel like most of it is unnecessary.
    Its not as difficult as it looks (definitely intimidating at first). When wiring a rocker switch with separate breaker, all you need to know is power in, switch out, to the breaker to component . I changed up my wiring configuration a little bit. I moved the stereo switch over to auxiliary battery and cigarette lighter direct (along with the switch and breaker) to the starter battery. I will do the same and add a cigarette lighter with switch and breaker to the portside auxiliary battery. This way I can trickle charge though these cigarette lighter connections...instead of going deep under the helm (which is where my starter battery is now located) and inside the portside walkthrough locker. I can certainly reach all them if I had to, but just adding as a convenience.

Tags for this Thread

Posting Permissions

  • You may not post new threads
  • You may not post replies
  • You may not post attachments
  • You may not edit your posts
  •